How do I configure User, Contact and/or Asset scoring?
Contact, User, and Asset Scoring
Accessing the Platform's Scoring Features
Contacts: allows you to set metrics for measuring contact interest level.
Users: allows you to set metrics for user performance and activity levels.
Assets: allows you to set metrics for the effectiveness of your assets.
Opportunities: allows you to set metrics measuring the value of sales and deals.
Note: in this article, we set up contact scoring metrics for our example, the steps are essentially the same for user scoring and asset scoring. For opportunity scoring, follow this link.
Section Overview
Here, you will see 4 tabs:
Scoring Rules: This allows you to specify events that indicate contact interest (e.g. visiting your website, opening a specific email, etc)
Scoring Models: This allows you to assign numerical scores to the events specified in “Scoring Rules”, for example, I might give someone who lives in my area, opened a promotional email, and clicked on the link within the email a score of 50.
Score Depreciation: This will allow you to specify how much a contact’s score will decrease due to inactivity.
Triggers: This allows you to specify which scores indicate high and low levels of interest.
Scoring Rules
Creating a Scoring Rule (Contacts, Users, and Assets)
Email: allows you to create scoring rules for web materials created in Bridge
Web: allows you to create scoring rules for web materials created in Bridge
Form: allows you to create scoring rules for forms created in Bridge
Ext. Sites: allows you to make rules for websites not created in Bridge
Ext. Links: allows you to make rules based on links embedded in other media (such as blog posts or email)
Data: allows you to make rules based on the data of your contact records
For this tutorial, we will select “Email”.
Any Activity: assigns a score to your contacts if any emails sent to them are opened.
Specific Activity: only assigns a score if they opened up an email that you specified.
For this tutorial, we will select “Specific Activity".
elect all emails that you wish the rule to apply to, and then click “Done”.
In this example, a contact would get a score if he or she opened any one of the three emails selected.
- Email
- Web (Landing pages and Websites)
- Print (PDF)
- Playbooks
- Powerpoint presentations
- eBooks
- Forms
- External site links (website tracking code activity)
- External links (trackable links)
- User data (basic)
- Certifications
- Onboarding playbooks
- Marketing playbooks
- Engagement scores
- User Groups
- Organization record data (basic)
- Organization record data (additional)
- User Contact Custom data
- User activities
- Organization groups
- Drip campaigns
- External data
- Social media (Likes and Comments)
- Redeem requests
- Learning Management
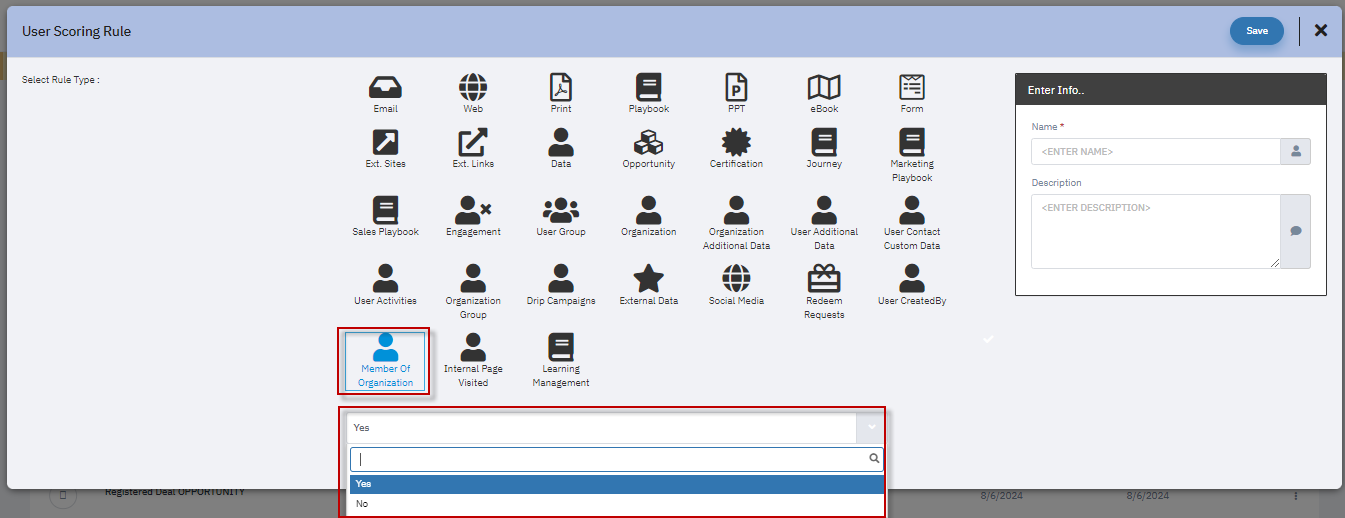
User Scoring Update:
A new condition has been added to the User Scoring rule, allowing you to identify users who are added to the organization and those who are not. You can now assign scores based on your specific requirements.
Editing a Scoring Rule
To delete a rule, click on the three-dot icon, and then click on the trash icon.
Scoring Models
Creating a Scoring Model
This will bring up the above screen:
Score on Fit Model: makes the value of the score constant.
Score on Activity (depreciated over time): makes the value of a score decrease over time
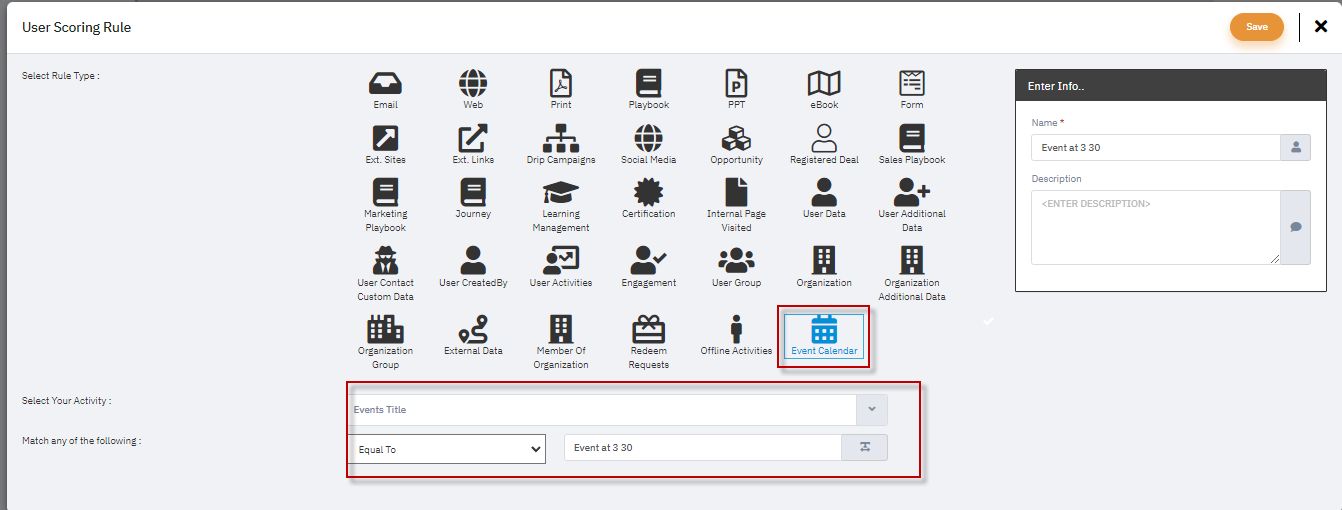
- A new option has been added to the User Scoring feature, allowing you to include Events Calendar conditions when assigning scores based on specific criteria. On the User Scoring Rule page, you will now see the "Events Calendar" option under the activity selection.
To create a rule:
Click on the "Events Calendar" icon.
A dropdown will display various conditions related to the event calendar. You can filter by event titles, start/end dates, location, and more.
Select the condition that matches your criteria.
Assign points to users when they meet the specified event condition, such as attending or scheduling events with specific titles (e.g., "Event at 3:30").
Save the rule, and the scoring will automatically update based on user activity about the event calendar.
This feature helps you track user engagement with events and assign appropriate scores.
Score on a Fit Model
For this section of the tutorial, we will select “score on fit model”.
Once you’re done creating your condition, give it a unique name, description and assign it a score value of your choice. When you are ready to save and close the window, click “Save”.
Score on activity (depreciate over time)
For this part of the tutorial, we will select “score on activity (depreciated over time)...”. Select the activity that you want the depreciating score to come from using the “What would you like to score on” drop-down menu, and then drag & drop your rules in the provided box. [To set more complex conditions, see the ‘Advanced Conditions Parameters’ section].
Advanced Condition Parameters
To specify whether the contact must complete all of the activities, any single activity, or some combination of activities, click on the “Advanced” link.
To specify that contact must complete all activities to earn a score, write “and” between each activity number.
To specify that the contact can perform either activity to earn a score, write “or” between each activity number.
To make specific combinations of activities necessary to earn a score, place the activity numbers in parentheses.
For example, in this box, to receive any score at all, the contact would have to have opened an email, and then either visited a landing page or filled out a form.
Editing a Scoring Model
Click on a scoring model to edit it.
To delete a rule, select it, and then click on the trash icon.
Score Depreciation
The Score Depreciation Tab
Triggers
The Triggers Tab
When you are done, click on “Apply Triggers”.
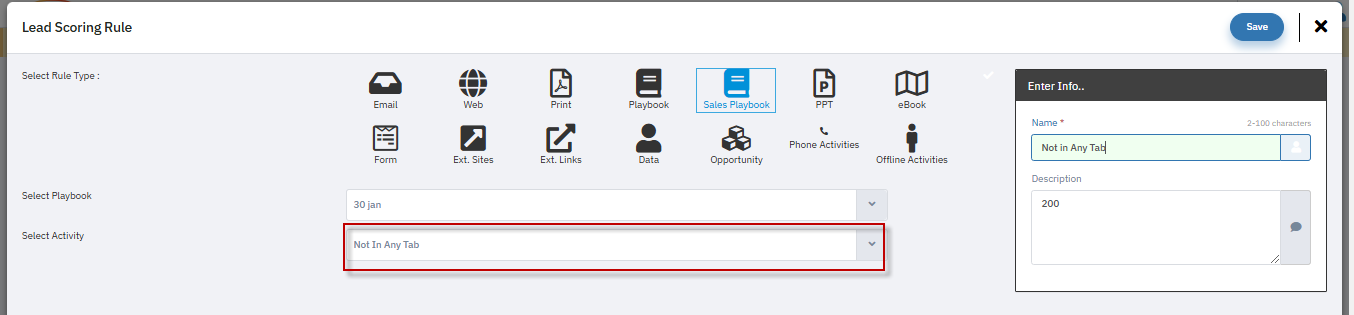
A new scoring condition has been introduced for Sales Playbooks, allowing businesses to assign scores to contacts based on their playbook tab status. This enhancement provides a more refined approach to lead qualification by identifying and prioritizing unengaged or progressing contacts.
How It Works
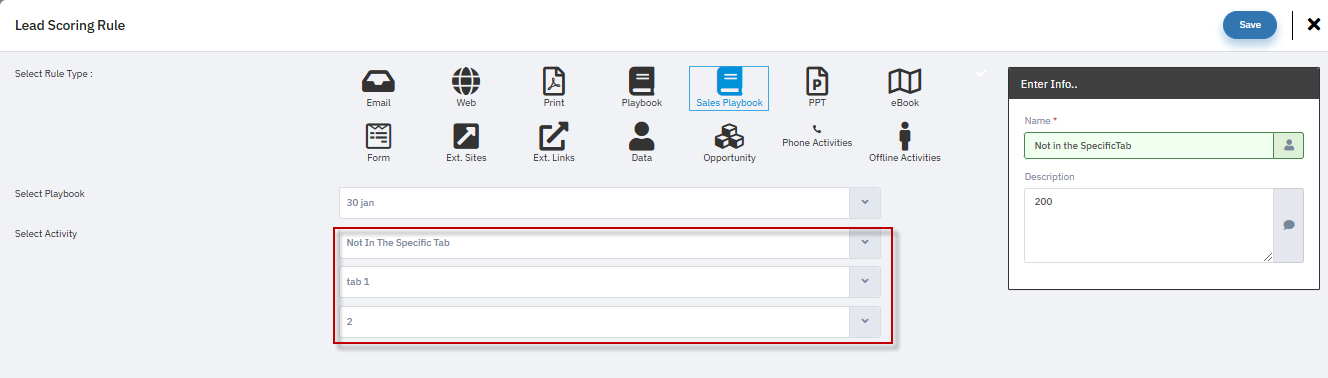
The scoring system now supports the ‘Not In’ condition, offering two scoring rules:
Not In Any Tab – Assigns a score to contacts who have not entered any tab or step in the playbook. This helps track inactive or unengaged leads.
Not In The Specific Tab – Assign a score to contacts who are not part of a selected tab or step, ensuring that leads who have skipped critical stages receive appropriate scoring adjustments.
Use Case Example
A marketing team wants to assign a lower score to contacts who have not yet entered any tab in the playbook, signaling low engagement or cold leads.
A sales team prioritizing demo bookings might assign higher scores to contacts who are not in the "Closed-Won" tab, meaning they are still active prospects.
Steps to Apply Scoring Rules
Navigate to Scoring Rules under the marketing automation module.
Choose Create a New Scoring Rule or edit an existing one.
Select Playbook-based Scoring and apply the ‘Not In’ condition.
Assign point values based on your strategy.
Save and activate the rule.
The CRM Sync condition is now available in Contact Scoring Rules under the Data option.
This allows businesses to assign scores based on CRM sync status, helping prioritize leads and segment contacts effectively.
Steps to Apply CRM Sync in Scoring Rules:
Navigate to Scoring Rules in the platform.
Click Create New Rule or edit an existing one.
Select "Sync with CRM" under the Data options.
Assign a score for Yes (Synced) and No (Not Synced) contacts.
Save and activate the scoring rule.
Key Takeaways
Better Contact Segmentation – Easily filter and manage contacts based on CRM synchronization.
More Targeted Email Campaigns—Ensure drip campaigns only reach relevant contacts.
Improved Lead Scoring: Prioritize and score leads based on their CRM sync status for better engagement.
Overview
A new scoring rule allows you to award points to contacts who filled out a specific form on a specific date, enabling more precise and time-sensitive scoring.
Steps to Add a Date-Based Scoring Rule
Navigate to Scoring Settings
Go to Setup > Scoring in your system.
Click Add New or edit an existing scoring rule.
Select ‘Specific Form Filled on Specific Date’
Choose Contact as the scoring type (if applicable).
Pick Specific Form Filled Date from the condition options.
Configure the Form and Date
Identify which form you want to track.
Enter the date or date range for which the scoring should apply.
Assign the desired points.
Benefits
More Accurate Lead Qualification: Reward contacts who take timely actions (e.g., a form fill right before a webinar).
Overview
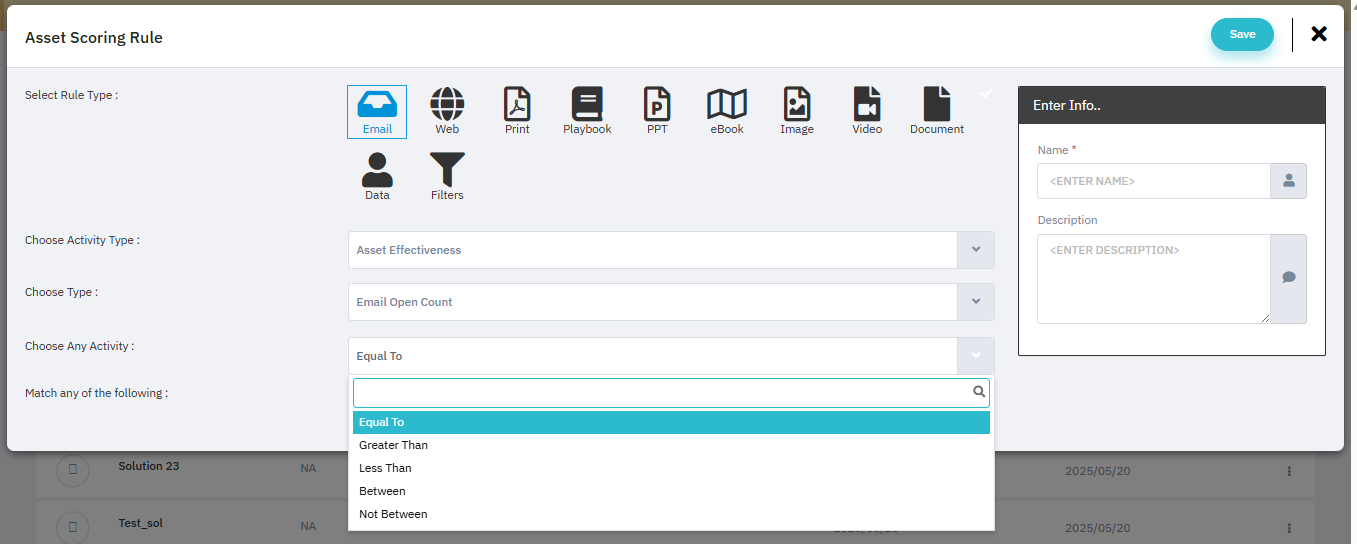
A new scoring condition called "Email Open Count" has been added to the Mindmatrix scoring module. It enables you to assign scores to Contacts, Users, and Assets based on how many times an email has been opened. This allows for more granular engagement tracking and lead qualification.
Where You Can Use This
Contact Scoring

User Scoring

Asset Scoring
You can define scoring logic for each entity individually or in combination.
How to Configure “Email Open Count” Scoring
Navigate to Scoring Setup
Go to: Connections > Scoring > Select Entity (Contact/User/Asset)
Add New Scoring Rule
Click + Add New Rule
Choose Category: Email Activity or similar
Select Condition: Email Open Count
Define Logic
Choose from operators such as:
Equals (=)
Greater Than (>)
Less Than (<)
Between / Not Between
Example: Email Open Count ≥ 3

Assign Score
Set the number of points to be awarded once the condition is satisfied.
Save the Rule
Use Case Examples
Lead Scoring
Assign more points to leads who open your emails multiple times, indicating strong interest.
User Engagement Tracking
Differentiate between highly engaged users (5+ opens) and passive ones.
Intelligent Automation
Trigger targeted follow-up or remove disengaged users from campaigns automatically.
Benefits
Precision Lead Qualification
Improved Segmentation and Reporting
Smarter Marketing Decisions
Dynamic Score Updates Based on Real-time Behavior

New Filter Option in User Scoring
A Filter option is now available on the User Scoring page for more precise scoring assignments.
How It Works:
Apply user filters to narrow down specific groups of users
Assign scoring directly to the users who match the applied filters
Benefits:
Targeted Scoring: Apply scores to specific user segments rather than individual users
Bulk Operations: Efficiently manage scoring for multiple users at once
Consistent Criteria: Ensure scoring alignment across user groups with similar characteristics
This feature allows more precise and targeted scoring assignments based on predefined user criteria.
Related Articles
How do I mark a Contact as a Lead?
Navigating to your Contacts page: Go to Connections > Contacts. Note: On the Bridge platform, clients can personalize menu navigation to better suit the specific needs of their Users. Things may be under a different part of your navigation bar ...Setting Up User Tracking for Internal Page Visits: Enhancing Company User Lists, Drips, and Scoring
Introduction: Implementing a system to track internal page visits by super admins across your company's platforms can significantly improve your user management strategies. By integrating detailed user tracking into your company user lists, drip ...How does contact/lead syncing for CRMs work?
Posted by The Team at Mindmatrix on 12 January 2016 03:22 PM This article will provide you with an overview of how contact and lead syncing works between Mindmatrix and your CRM. General Points CRM integration is a bi-directional sync. Only one CRM ...How do I create a Lead Routing Pool?
Admins with lead routing access under the Setup tab may create lead pools in the lead routing section. These pools will allow the automatic assignment of leads which users may accept or reject. Recipients of leads will receive a notification that a ...What are the asset smart list condition options?
In the asset smart list, you will find out which Emails have been downloaded by the users based on the condition you use on both lists. This condition will give us the user count of users who have downloaded the Email 4 times and above. There are ...