How do I create a User Smart List?
It is possible to personalize navigation menus within Mindmatrix software. If you are unable to navigate to the correct page, contact your platform administrator.

Who would use this?
User Smart Lists are great tools to dynamically segment users based on their attributes or actions.You can also use smart lists to send notifications to other users or to yourself.
1.Go Connections > Lists
2. Select User Smart Lists > Create
3. Add in a Name > Description > Filter(s) > click next
4. Notice that you can choose from an attribute (user record data) or an action (collateral activity, for example).
In the example below, I created a filter for users that lost an opportunity due to price.
5. Once you add those filters, you can choose a timeline and if you would like to show anonymous contacts who complete an action.
6. If you click on the "Advanced" tab, you'll see that you have one filter selected.
.
7. Click Finish - the list will show you qualifying users
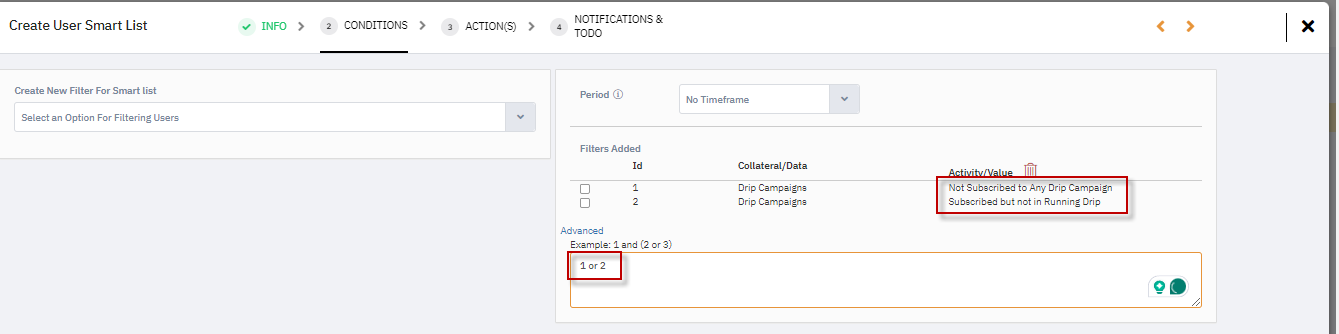
- The User Smart List now includes additional conditions for filtering users based on their subscription to drip campaigns. To filter users based on their campaign involvement, use the following steps:
Subscribed to Running Drip Campaign:
On the "Conditions" tab, while creating or editing a User Smart List, select the condition "Subscribed to Running Drip Campaign."
This will show the total number of users who are currently subscribed to an active, running drip campaign.
Not Subscribed to Any Campaigns:
For filtering users who are not subscribed to any drip campaign, select the option "Not Subscribed to Any Drip Campaign."
Additionally, you can refine the filter by adding "Subscribed but Not in Running Drip Campaign" to find users who are no longer active in a campaign.
Combine Conditions:
To find users who fit either condition, use the "OR" operator to combine the conditions (e.g., "1 OR 2"). This will give you a broader list of users based on their campaign involvement.
This feature helps efficiently filter users based on their engagement with active drip campaigns.

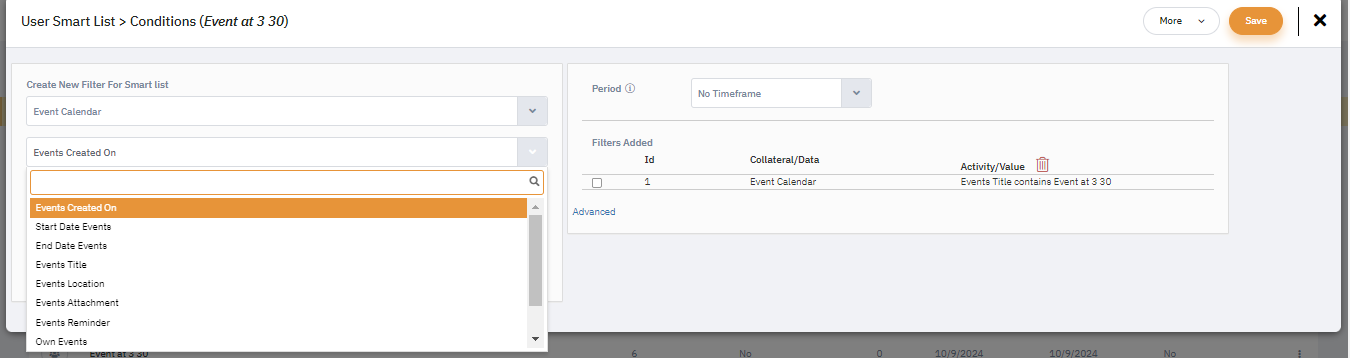
- The User Smart List now also includes conditions related to the Events Calendar, allowing you to filter users based on their interactions with events.
To use this feature, follow the steps below:
In the Conditions tab, choose "Events Calendar" from the filter options.
You will be able to select from various conditions such as:
Events Created On
Start Date Events
End Date Events
Event Title
Event Location
Event Attendee, and more.
For example, if you want to filter users based on events titled "Event at 3:30", select Event Title, and set the condition to "Contains Event at 3:30."
Save the Smart List, and the users meeting the event criteria will be included in the list.
This feature allows for precise user segmentation based on event participation or scheduling.
 A new condition has been added to the User Smart List that allows filtering based on whether a Partner Admin has been assigned to any user group, providing enhanced user segmentation capabilities.
How It Works:
While creating or editing a User Smart List, select the new Partner Admin condition from the available filter options
The system will show all users who belong to user groups where a Partner Admin is assigned
This condition works in real-time, automatically updating as Partner Admin assignments change
Use Cases:
This condition is particularly useful for:
Administrative Oversight: Identifying users who are managed by Partner Admins for reporting and compliance purposes
Targeted Communication: Creating focused lists for Partner Admin-supervised groups to ensure appropriate messaging
Organizational Structure: Segmenting users based on administrative oversight structure for better management hierarchy visibility
Training Programs: Organizing training initiatives based on Partner Admin supervision requirements
Configuration Benefits:
Dynamic Updates: Smart lists automatically refresh when Partner Admin assignments change
Multiple Criteria: Combine with other conditions for more precise user segmentation
Reporting Efficiency: Streamline administrative reporting based on Partner Admin structure
Conclusion:
This enhancement significantly improves user segmentation capabilities by incorporating Partner Admin assignments into smart list filtering. Organizations can now better organize users based on administrative structure, enabling more effective management, communication, and reporting workflows that align with their Partner Admin hierarchy.
KB Article Link -
https://helpdesk.mindmatrix.net/portal/en/kb/articles/contact-user-and-asset-scoring
New Partner Admin Condition in User Scoring
A new condition has been added to the User Scoring feature that works with User Group selection and Partner Admin assignments, enabling more sophisticated scoring based on administrative roles.
How It Works:
While configuring User Scoring, you can now apply a condition to check if a user is assigned as a Partner Admin within a user group or not added to a user group
If the condition is met, the defined score will be applied to the user automatically
The scoring system evaluates both Partner Admin status and group membership simultaneously
Scoring Applications:
Administrative Role Recognition: Award higher points to users with Partner Admin responsibilities to reflect their leadership positions
Group Participation Scoring: Score users based on their group membership status and administrative oversight
Leadership Identification: Automatically identify and score users in administrative positions for recognition programs
Performance Metrics: Create scoring models that account for both individual performance and administrative contributions
Strategic Benefits:
Role-Based Scoring: Align scoring with organizational hierarchy and administrative responsibilities
Automated Recognition: Reduce manual effort in identifying and scoring administrative roles
Comprehensive Evaluation: Include administrative duties in overall user performance assessment
Conclusion:
This Partner Admin scoring condition provides organizations with the ability to create more nuanced and comprehensive user scoring systems. By incorporating administrative roles and group membership into scoring calculations, organizations can better recognize leadership contributions and create more accurate performance evaluation models that reflect the full scope of user responsibilities.
KB Article with Edits -
https://helpdesk.mindmatrix.net/portal/en/kb/articles/automation-manager-feature-overview
New Partner Admin Condition in Automation Manager
A new condition has been introduced in the Automation Manager for both User and Organization types related to Partner Admin assignments, enabling automated workflows based on administrative structure changes.
How It Works:
While setting up an automation, you can now add a condition to check if a Partner Admin has been assigned to any User Group or Organization Group
When this condition is met, the automation will trigger the defined actions accordingly
The system monitors Partner Admin assignments in real-time and executes automations immediately upon condition fulfillment
Automation Applications:
Role-Based Triggers: Activate specific workflows automatically when Partner Admins are assigned or removed from groups
Administrative Notifications: Send immediate alerts to relevant stakeholders when Partner Admin assignments change
Group Management: Automate access permissions, resource allocation, and communication workflows based on Partner Admin presence
Compliance Automation: Trigger compliance checks and documentation updates when administrative oversight changes
Workflow Enhancements:
Immediate Response: Automations execute instantly when Partner Admin conditions are met
Multi-Level Actions: Trigger cascading workflows that affect multiple systems and processes
Conditional Logic: Combine Partner Admin conditions with other criteria for sophisticated automation rules
Conclusion:
The Partner Admin condition in Automation Manager transforms how organizations handle administrative changes by enabling immediate, automated responses to Partner Admin assignments. This enhancement reduces manual administrative overhead, ensures consistent process execution, and maintains proper oversight protocols automatically, leading to more efficient and reliable administrative operations.
Related Articles
What are the user smart list condition options?
There are many options to create user smart lists in Mindmatrix. The outline below explains the options available for the condition filters within the user smart list. To learn how to create a user smart list, follow the instructions here. User ...What are the contact smart list condition options?
There are many options to create contact smart lists in Mindmatrix. The outline below explains the options available for the condition filters within the contact smart list. Contact Record Data This option is used to filter contacts based on the ...What are the asset smart list condition options?
In the asset smart list, you will find out which Emails have been downloaded by the users based on the condition you use on both lists. This condition will give us the user count of users who have downloaded the Email 4 times and above. There are ...What are the MDF smart list condition options?
There are many options to create MDF smart lists in Mindmatrix. The outline below explains the options available for the condition filters within the MDF smart list. Activities This Condition is used to filter MDF plans based on activities Amount ...What are the opportunity smart list condition options?
There are many options to create opportunity smart lists in Mindmatrix. The outline below explains the options available for the condition filters within the opportunity smart list. Account Name This option is used to filter opportunities based on ...