How do I configure the view assets page?

You can customize the appearance of categories that appear on your view assets page by clicking on "Asset Configuration" under the Setup section in your account.

You will need permission to personalize search criteria in Mindmatrix in order for these changes to go into effect.
To change the appearance of categories, go to Setup > Asset Management > Asset Configuration.
On the Asset Configuration page, click on the Asset Search Configuration option.
Here, you can setup new categories or add new categories.
Select a tab you wish to personalize.
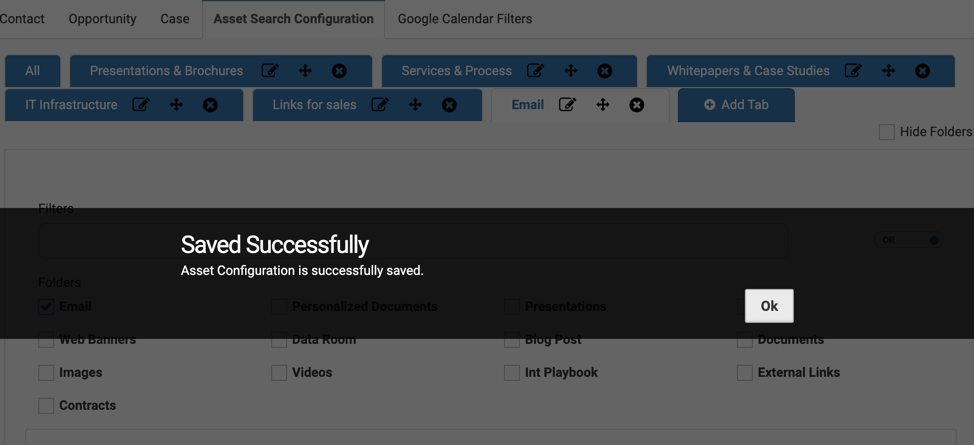
In this example, we've selected the "Email" tab. You can personalize the appearance of this tab in the search section, by clicking on the Thumbnail or Icon options.
If you select a thumbnail, you can upload a new image. (Ideally with dimensions as
If you select Icon, you can select an icon that should be associated with the category from the drop down menu. A preview of the icon selected will appear on the right-hand side.
After you select an icon or image, click Save and a confirmation message will appear.
Finally, navigate to the view assets section to review your update:
Here, you can see the Email icon is updated.
How to Configure and Use the “Copy Link” Feature for Images, Documents, and Videos
A new option has been added to the Assets Library page (installurl/#asset-overview) that allows users to copy asset links without needing to open the asset first. This feature provides a quick way to share PDF, image, or video links.
Supported Asset Types
- Documents: Only PDF files include a Copy Link option. Other document types (e.g., PowerPoint, Word) do not have this feature.
- Images: All images display a Copy Link option.
- Videos: Both MP4 videos and embedded-link videos (e.g., YouTube, Vimeo) support the Copy Link option.
By offering a Copy Link feature for these asset types, sharing content has become faster and more convenient for all users.
You can customize the Filters dropdown settings on the Assets Library page to meet specific organizational requirements. This ensures users can quickly locate and view relevant assets based on predefined filter conditions.
Steps to Configure the Filters Dropdown
Navigate to Asset Configuration
Go to setup > assets > configuration/v5.Click on the Settings tab.
Update the Default Filter Condition
Locate the Default Filter Condition setting.
Adjust these settings based on your requirements (e.g., filter by asset type, asset owner, etc.).
Save the Configuration
Click the X (close icon) to exit Settings.
- Click Save the Configurationto apply changes.
Once saved, the changes will be reflected on the Asset Library page.
Result:
Your chosen default filter condition will now appear in the Filters dropdown on the Asset Library page, streamlining how users browse and locate assets.

A new enhancement has been introduced to the View Assets page that allows users to add and send multiple assets through a Dataroom template, streamlining asset sharing workflows.
How It Works:
Asset Selection and Template Addition:
- On the View Assets page, select multiple assets using checkboxes
- Once assets are selected, the Add to Dataroom Template option appears
- Choose the desired Dataroom template from available options
- Selected assets are automatically added to the chosen Dataroom template
Contact Selection and Sending:
5. In the final step, select the target contact or contact list
6. Send the populated Dataroom to the selected recipients
6. Send the populated Dataroom to the selected recipients
7. Recipients receive access to all selected assets through the Dataroom interface
Benefits:
- Workflow Efficiency: Streamlines the process of grouping and sharing multiple assets
- Time Savings: Eliminates need to add assets individually to Datarooms
- Bulk Operations: Handle multiple assets simultaneously for faster distribution
- Organized Sharing: Maintain professional presentation through Dataroom templates
Use Cases:
- Sales Presentations: Quickly compile product information, case studies, and marketing materials
- Partner Onboarding: Share multiple training documents and resources efficiently
- Campaign Materials: Distribute complete campaign asset packages to partners or customers
- Documentation Sharing: Send comprehensive document sets for projects or compliance
Workflow Improvements:
- Reduced Steps: Fewer clicks required to share multiple assets
- Better Organization: Dataroom templates provide structured asset presentation
- Professional Distribution: Maintains consistent branding and organization standards
Conclusion:
This enhancement significantly improves asset sharing efficiency by enabling bulk addition of assets to Dataroom templates directly from the View Assets page. Users can now quickly compile, organize, and distribute multiple assets through professional Dataroom presentations, reducing manual effort while maintaining high-quality asset sharing standards.
A new enhancement has been introduced on the View Assets page that allows users to select and download multiple assets at once. This feature streamlines the asset retrieval process by enabling bulk downloads, eliminating the need to download assets individually and saving significant time for users managing large content libraries.
Key Highlights
- Users can now select up to 25 assets at a time, even if they are located on different pages within the asset view.
- Selections persist across page navigation, allowing users to browse and select from multiple pages.
- Once assets are selected, a toolbar appears at the bottom of the page with several options, including the Download button.
- Clicking the Download button initiates the export process for all selected assets.
Download Process
After initiating the download:
- A notification popup appears in the top-right corner indicating that the assets are being prepared for download.
- The notification includes a link labeled "Click Here to View Export Status Page."
- Clicking this link redirects you to the Export Status page, where the downloaded file can be accessed once the export is complete.
Supported Asset Types
Users can download the following asset types using the bulk download feature:
- Print Assets
- Presentations
- Documents
- Images
- Image Banners
Restricted Asset Handling
Note: Restricted assets cannot be downloaded through this feature. If restricted assets are selected, the system will display an alert message indicating that those assets cannot be downloaded. Users should deselect restricted assets before proceeding with the download.

Benefits
- Enables quick bulk downloading of multiple assets in a single action.
- Saves time by allowing selections across multiple pages without losing previous selections.
- Provides export tracking through the Export Status page for monitoring download progress.
- Improves productivity for users managing large asset libraries by streamlining the retrieval process.
Conclusion
The multiple asset download feature on the View Assets page significantly enhances user productivity by enabling bulk downloads of up to 25 assets at once. With cross-page selection capability, export status tracking, and clear handling of restricted assets, this enhancement provides a streamlined and efficient way for users to retrieve the content they need from the platform.
Related Articles
Announcement - v5 upgrades to Mindmatrix Bridge - View Assets Configuration
In October 2025, we'll be upgrading the asset configuration page in Mindmatrix. This view is only available to administrators with access to the Setup section of the product, and right to configure how assets are displayed in Mindmatrix software. ...How do I View My Asset Library?
Your asset library contains many pre-constructed content packs ranging from Emails to Blog Posts to Playbooks to help enable your sales and marketing teams. You also have the ability to create and upload your own content that can be used within the ...How do I setup asset configuration tabs and categories?
It is possible to personalize navigation menus within Mindmatrix software. If you are unable to navigate to the correct page, contact your platform administrator. Asset Configuration will set up the search features in Assets > View Assets page. How ...New Design for Accounts and Overview Page (V5) - Comprehensive Guide
Introduction and Overview A transformative new design for Account Records and the Overview Page (V5) has been introduced, representing a significant evolution in how users interact with account management functionality. This comprehensive update ...Marketing Playbooks Admin Page (Version 5)—Comprehensive Guide
Overview: The Marketing Playbooks Admin Page Version 5 (V5) represents a significant upgrade from Version 4, introducing a redesigned interface with enhanced functionality for creating, configuring, and managing marketing playbooks. This new version ...