How do I integrate my Salesforce communities account with Mindmatrix and activate the SSO connection?
User requirements:
You must be an Admin in Salesforce Communities with an access to integrate with third party applications and to install apps.
You must be a Super Administrator within Mindmatrix.
About SSO (Single-Sign-On):
You can only have one SSO connection at a time. If you enable an SSO connection for Salesforce communities, you cannot enable similar connection via OAuth or SAML from another third party provider.
Once you setup an SSO connection, make sure you check and review your data requirements before starting the integration process.
Schedule a meeting with a Mindmatrix software specialist to scope out the roles and groups for your integration or if you need any clarity on how to assign users permissions between the two platforms (Salesforce and Mindmatrix).
How does SSO work?
With an SSO activated, users may complete a process called "authentication" within their Salesforce accounts.
About "authentication":
Authentication needs to only happen one time.
In this process, users click on a link within Salesforce, confirming that they are able/allowed to access both Salesforce and your portal in Mindmatrix
During this process, Mindmatrix and Salesforce will "talk" to each other. Salesforce will pass authorized data to Mindmatrix that will be used to setup the user's account within the Mindmatrix portal.
As the user account is setup, the user will also be assigned to -
User Group - Determines what assets the user has access to within the Mindmatrix platform.
Role - Determines what the user is allowed to do within Salesforce as they interact with any Mindmatrix module within the app.
Organization - Sorts the user by the company they belong to and is used for reporting purposes.
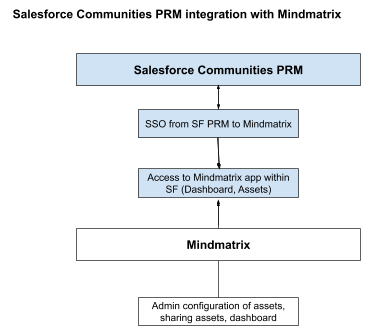
Visual flow of SSO authentication process:
Mapping out roles and groups
To get started, we recommend creating a list or table that describes how you would like to organize your PRM users.
There are two options:
1. Sync users from Salesforce as Super Administrators
2. Sync users from Salesforce as Sales Users
For example:
Filling this out will help you as you complete the integration form within Mindmatrix.
Completing the integration - Part I. Integrating through Mindmatrix.
The Mindmatrix authentication process will allow a Super administrator within Mindmatrix to connect their account to Salesforce. This process needs to be completed one time in order to initiate setup with Salesforce.
1. Go to Setup > CRM Settings > CRM > Configure (selecting Salesforce)

2. On the login page for Salesforce, click "Custom Domain".

3. Enter your custom domain for Salesforce communities. This may be - mycompany.mysalesforce.com - for example, where mycompany is the name of your organization.
4. Enter the login information then click "Allow" when prompted.
Now, you may start to configure what data you would like to push to Salesforce and pull into Mindmatrix.
For this we have to map organization and user only.
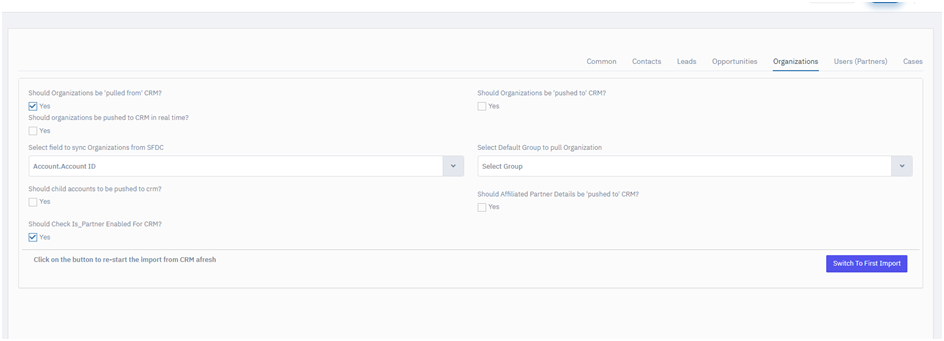
“Should Organizations be “pulled from” CRM” and “Should Check Is_Partner Enabled for CRM?” fields should always be checked for organization.
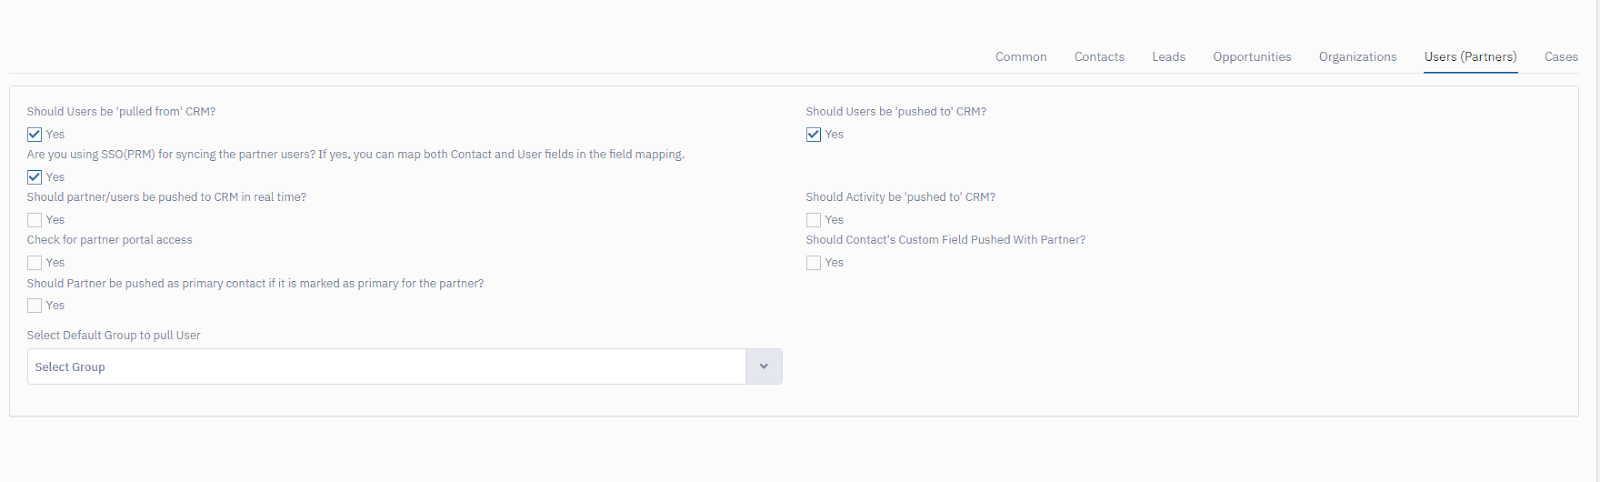
“Should Users be “pulled from” CRM”? and “Are you using SSO(PRM) for syncing the partner users? If yes, you can map both Contact and User fields in the field mapping” fields should always be checked for users.
Here is the field mapping for organization and user : the mandatory fields: Account name as per your requirement you can map the other fields too.
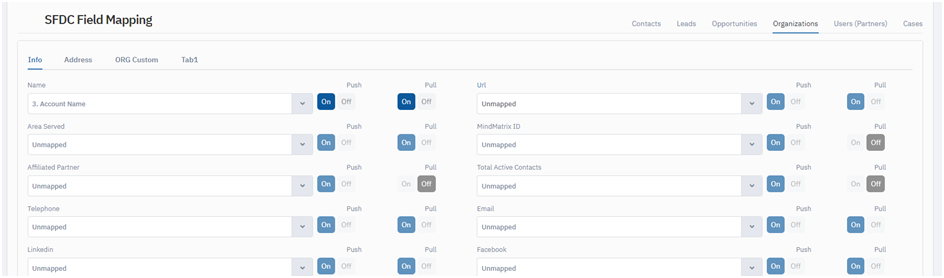
For User: user.firstname, user.lastname, user.email, user.title is mandatory.

You should attend a CRM integration kick off call with a CRM specialist so you understand what data can be passed between Salesforce and Mindmatrix. Your specialist can complete the integration for you once these rules are defined.
Completing the integration - Part II. Integrating through Salesforce.
To complete this part of the integration, you'll need the following:
Your install URL (this would have been provided during the setup process)
Developer Token
Mindmatrix Communities Package installed within Salesforce
1. Contact support@mindmatrix.net to request a Developer API Key and the link to install your SF communities package. Here is the latest link of package [main ]:
link:https://login.salesforce.com/packaging/installPackage.apexp?p0=04t0o000003bT6r (This will be provided to you if you have already purchased a Salesforce communities integration with Mindmatrix).
2. Mindmatrix will forward the Developer API Key.
3. Login to Salesforce and click on the "App launcher". Look for "MM API Settings". This will give you access to configure your version of the app.
4. Under the API settings tab, enter:
Install URL
Token (Developer Token)

5. Click Save.
6. Configure your User Group settings. Here in the below screenshot are the condition based on which we can configure the user group settings based on different criteria’s.

This is for the partners users.
For example:

By selecting the check box “Please remove previous user group” will remove the old condition from the user partner in that account.
7. Copy and paste the exact elt_aes and elt_hs256 provided to you by our team.
JWT Settings
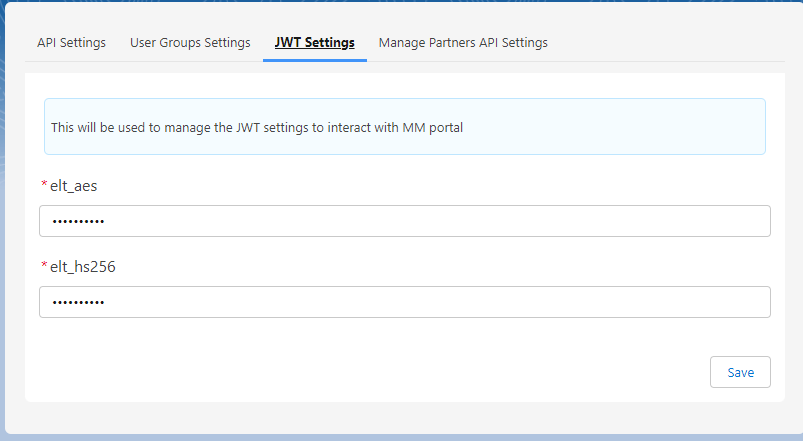
JWT Settings
8. Here, users can access the settings to configure their version of the Mindmatrix PRM portal within Salesforce Communities.
Components of Salesforce
[AMPWidgetContainer] :
This will help you to load the MM page with in Salesforce.
9. Go to community builder and add the page then drag and drop the Mindmatrix component [AMPWidgetContainer] on the page from components icon.
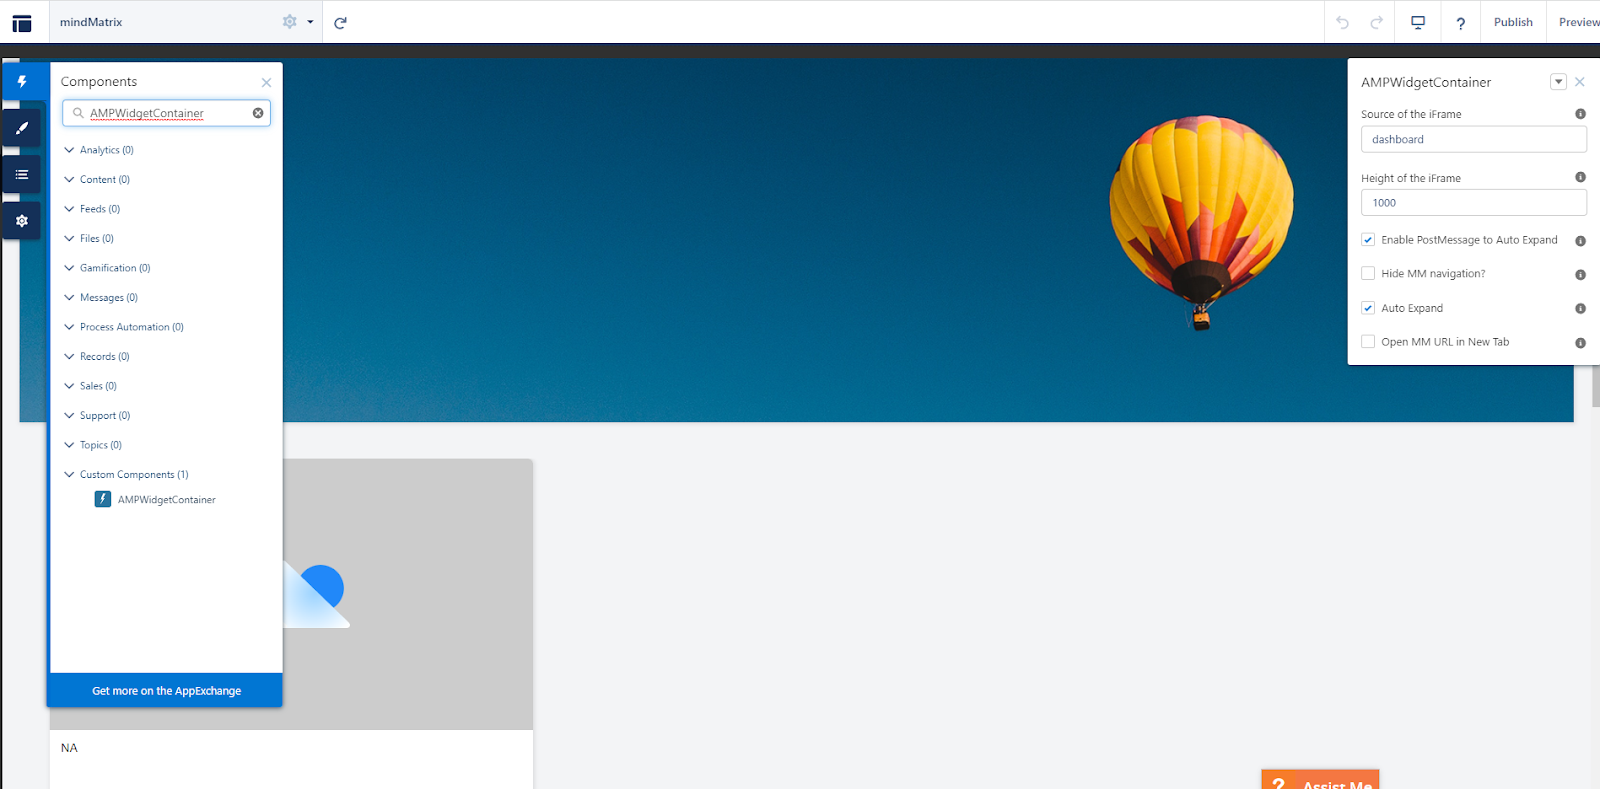
10. The AMPWidgetContianer will popup in the right hand side.
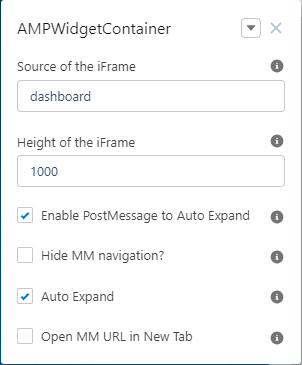
1. Source of the iframe : here you can add any MM URL.
MM URL in https://main.dvl.amp.vg/#manage/campaigns/report/summary--- this will be provided by MM team.
In the source of the iframe add “manage/campaigns/report/summary”
It will open that page in salesforce of MM.
For dashboard you can add source of the iframe : dashboard
2. Height of the iframe: 1000
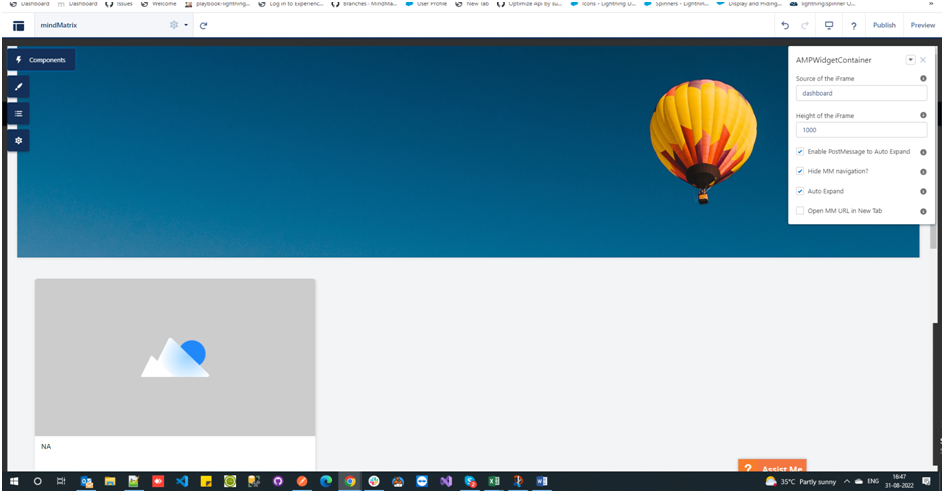
3.Hide MM Navigation: By default it was true.
If you want to show the navigation then just uncheck the checkbox and give that user to MM team. After that from our side we will enable the navigation.
4. Auto expand : When the checkbox is checked the page will load and it will expand on the whole page .
Please refer the screenshot.
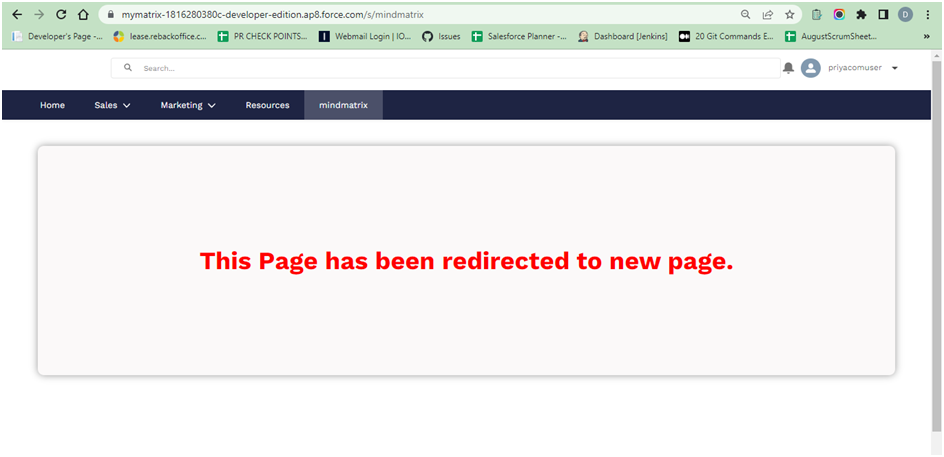
5. Open The MM URL In The New tab:
When the checkbox is checked page loads on the new tab in browser and leaves a message for the user.
Note : please uncheck the Auto expand checkbox before turning on this checkbox.
[MindMatrixCallToActionV1] : This is a button which helps you to redirect the MM page into the new tab(ExternalRedirection), Popup , InternalRedirection , or Enablement.
Follow the below mentioned steps:
Step 1. Go to community builder and add the page then drag and drop the MindMatrix component [MindMatrixCallToActionV1] on the page from the components icon.
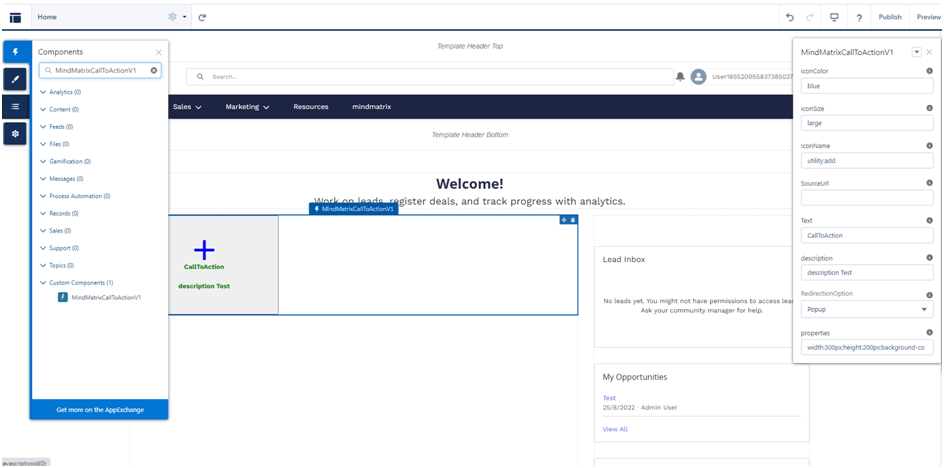
Step 2. In the right hand side MindMatrixCallToActionV1 will popup here in this section.
1. IconColor : Blue or you can give any colour.
2. IconSize: Large or small or x-small or xx-small, you can give any one of them.
3. IconName: utility: add or doctype:audio or standard: event or custom:custom11
These name based on the salesforce document ( please refer the doc)
https://www.lightningdesignsystem.com/icons/
4. Source of the iframe : Here you can add any MM URL
MM URL i.e.https://main.dvl.amp.vg/#manage/campaigns/report/summary--- this will be provided by MM team.
In the source of the iframe add “manage/campaigns/report/summary” it will open that page in salesforce of MM.
For dashboard you can add:
source of the iframe : dashboard
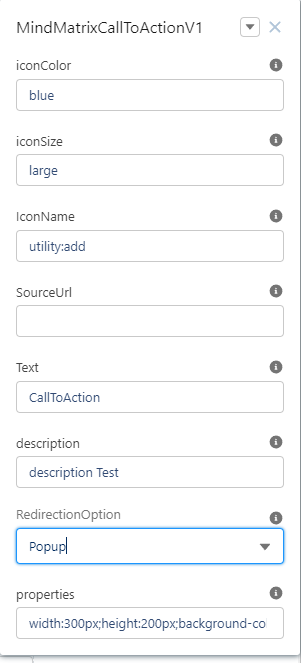
5. Text: give the text based on the requirement.
6. Description : give the description based on the requirement.
7. RedirectionOption: This is a picklist where you can select the option where you want to redirect the page.

8. Properties: Here you can give the Cascading Style Sheets(css)
Format: width:300px;height:200px;background-color:organge;color:green;
9. Publish your community and activate an SSO.
Related Articles
How can I configure a dashboard for Salesforce communities in Mindmatrix?
In order to utilize the Mindmatrix partner dashboard within Salesforce communities, you must have an integration between Salesforce and Mindmatrix. In order to setup a dashboard, you need to have Super Admin access enabled by an administrator for ...How do I add remote site settings to my Salesforce account?
Adding Remote Site Settings in your Salesforce account. Feature: For customers who have a custom domain, you may need to add a remote site to your salesforce settings. Who will be using this? Administrators using the salesforce authentication setup ...How do I update my branding details as a Salesforce Communities user?
In Mindmatrix, you can personalize assets with your branding details. For users that have Salesforce Communities PRM accounts and use the Mindmatrix app, you can update your logo and contact details in the branding section of your PRM. These ...How do I troubleshoot an issue with SSO (Single-Sign-On) and Mindmatrix?
We know that many clients may have custom SSO setups with their Mindmatrix accounts. This article will provide you with a brief guide on how to troubleshoot any issues you see. The login page appears to be down for users Users are logging in but are ...How to activate a WordPress blog account
Activate WordPress from your Mindmatrix Account To activate WordPress blog, click on profile icon and go to “view” option. In your user profile, click on the “Activate Social” tab and click on "Activate Account" link. Click on the WordPress logo. ...