
Feature:
This will provide a detailed report on the routed leads to the Lead Routing creator.
Who will be using this?
This will be used by Users who have Lead Routing enabled and created in their account.
Benefits:
This will provide details and status of each lead routed including the Users who have accepted, rejected, or have them pending.
Process:
To access the lead routing report, you can navigate to Reports > Lead Routing report page
You can also visit this page from inside the Lead Routing pool. For each Lead Routing, there will be a page for “Report”:

If it is Organization-based Lead routing,
then the report will contain the dropdowns of Organizations and Users. The
dropdown will populate only those Organizations that are assigned to the Lead
Routing. The default will be “All Assigned” Organizations and “All Users”. There
will be a period option (default will be “Collective") and the period will be
based on when the lead was added to the pool. All the stats on the report will be populated
based on the filtered values of the dropdowns and the period of lead added to
the pool.
1. “Leads Routed” chart: This will plot the chart based on when the lead
was added to the pool. If the period is collective or greater than 30 days then
it will default plot based on “Monthly Stats”. For the period of 30 days or less, it will default plot based on “Daily Stats”. Users can select any period
from the dropdown once loaded.
2. Total Leads in Pool: This will display the count of the number of leads added to the
pool within the selected period (the period will be mentioned in the top
right of the section, ‘to date’ for Collective). There will be a tooltip to
this section. This will be the sum of “Assigned” and “Unassigned” leads. Clicking
on the count will load the leads with a column of
‘Added to pool’ (default sorted).
3. Total Leads Assigned: This will provide the count of the number of unique leads from the pool that
are assigned to the users of the Organizations i.e. routed. There will be a tooltip to this section. The count will be a total of Accepted Leads, Rejected Leads, and Pending Leads. There will be a pie chart of Assigned vs Leads in Pool. Clicking on the count will load the leads with the columns of ‘Assigned’ (default sorted) and ‘Added to Pool’.
4. Total Leads Unassigned: This will provide the count of the number of unique leads from
the pool that are unassigned to the users of the Organizations i.e. not routed.
There will be a tooltip to this section. There will be a pie chart of Unassigned vs
Leads in Pool. Clicking on the count will load the leads with a column of ‘Added to pool’ (default sorted).
5. New Leads in Pool: This will provide the count of the number of leads added to the
pool within the last 24 hours. There will be a tooltip to this section. This will be the sum of “New Assigned” and “New Unassigned” leads. Clicking on the count will
load the leads with a column of ‘Added to pool’
(default sorted).
6. New Leads Assigned: This will provide the count of the number of unique leads added
to the pool within the last 24 hours that are assigned to the users of the
Organizations. There will be a tooltip to this section. The count will be a total
of Accepted New Leads, Rejected New Leads, and Pending New Leads. There will be a pie chart of New Leads Assigned vs New Leads in the Pool. Clicking on the count
will load the leads with the columns of ‘Assigned’
(default sorted) and ‘Added to Pool’.
7. New Leads Unassigned: This will provide the count of the number of unique leads added
to the pool within the last 24 hours that are unassigned to the users of the
Organizations. There will be a tooltip to this section. There will be a pie chart
of New Leads Unassigned vs New Leads in Pool. Clicking on the count will load
the leads with a column of ‘Added to pool’ (default sorted).
8. Accepted Assigned Leads: This will provide the count of the number of routed leads
accepted by the users from those that were added to the pool within the
selected period (the period will be mentioned in the top right of the
section, ‘to date’ for Collective). There will be a tooltip to this section. There
will be a pie chart of Accepted Assigned Leads vs Assigned Leads. Clicking on the
count will load the leads with the columns of
‘Accepted’ (default sorted) and ‘Assigned’.
9. Rejected Assigned
Leads: This will provide the count of the number of routed leads rejected
by the users. There will be a tooltip to this section. There will be a pie chart of
Rejected Assigned Leads vs Assigned Leads. Clicking on the count will load the
leads with the columns of ‘Rejected’ (default sorted,
the date when the last user of the Organization has rejected), and ‘Assigned’.
10. Pending Assigned Leads: This will provide the count of the number of routed leads that
are neither accepted nor rejected by the users. There will be a tooltip to this
section. There will be a pie chart of Pending Assigned Leads vs Assigned Leads.
Clicking on the count will load the leads with the
columns of ‘Assigned’ (default sorted) and ‘Added to Pool’.
11. Accepted New Leads: This will provide the count of the number of routed leads added
to the pool within 24 hours and accepted by the users. There will be a tooltip to
this section. There will be a pie chart of Accepted New Leads vs New Leads
Assigned. Clicking on the count will load the leads with the columns of ‘Accepted’ (default sorted) and ‘Assigned’.
12. Rejected New
Leads: This will provide the count of the number of routed leads added to
the pool within 24 hours and rejected by the users. There will be a tooltip to
this section. There will be a pie chart of Rejected New Leads vs New Leads
Assigned. Clicking on the count will load the leads with the columns of ‘Rejected’ (default sorted, the date when the last user of
the Organization has rejected), and ‘Assigned’.
13. Pending New Leads: This will provide the count of the number of
routed leads added to the pool within 24 hours and that are neither accepted
nor rejected by the users. There will be a tooltip to this section. There will be a pie chart of Pending New Leads vs New Leads Assigned. Clicking on the count
will load the leads with the columns of ‘Assigned’
(default sorted) and ‘Added to Pool’.
“User-wise
Routed Leads” widget
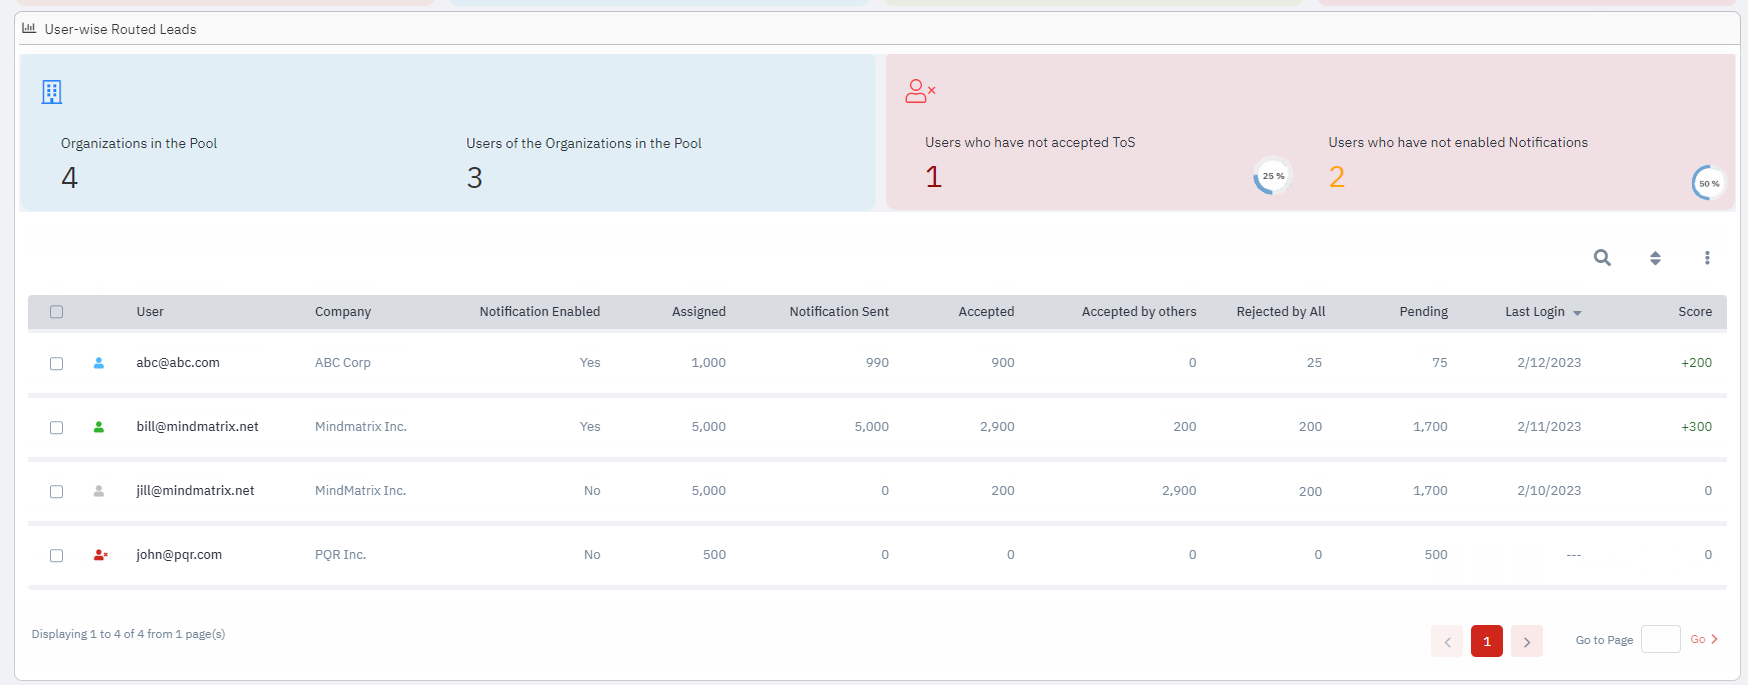
1. Organizations in the Pool - The Organization count of those that are assigned to the Lead
Routing. There will be a tooltip to this section. Clicking on the Organization
count will load the Organization grid.
2. User of the Organizations in the Pool – This will provide the count of the number of users assigned to
the Lead Routing. There will be a tooltip to this section. Clicking on the User
count will load the User grid.
3. Users who have not accepted ToS – This will provide the count of the number of assigned users to
the Lead Routing who have not accepted the ToS yet. There will be a tooltip to
this section. Clicking on the User count will load the User grid. There will
be a pie chart of ToS not accepted Users vs Users assigned.
4. Users who
have not accepted Notifications – This will provide the count of the number
of assigned users to the Lead Routing who have not enabled notification in the
profile. There will be a tooltip to this section. Clicking on the User count
will load the User grid. There will be a pie chart of Notification not enabled
Users vs Users assigned.
This will have the grid of assigned Users
of the Lead Routing with extra columns of Assigned, Notification Sent,
Accepted, Accepted by others, Rejected by All, and Pending.
5. Assigned –
This will provide the count of the number of leads from the pool that are
assigned to that user i.e. routed. The count will be a total of Accepted,
Accepted by Others, Rejected by All, and Pending Leads of that User. Clicking
on the count will load the leads with the columns of
‘Assigned’ (default sorted) and ‘Added to Pool’.
6. Notification Sent – This will provide the count of the number of leads from the
assigned leads of the User to whom the notification email is sent (if
configured). Clicking on the count will load the lead with the
columns of ‘Assigned’ (default sorted) and ‘Added to Pool’.
7. Accepted –
This will provide the count of the number of assigned leads accepted by the
user. Clicking on the count will load the leads with the
columns of ‘Accepted’ (default sorted) and ‘Assigned’.
8. Accepted by Others – This will provide the count of the number of assigned leads
accepted by other users of the same Organization that are also assigned to the
User. Clicking on the count will load the leads with
the columns of ‘Accepted’ (default sorted) and ‘Assigned’.
9. Rejected by All – This will provide the count of the number of assigned leads of
the User that are rejected by all users of the Organization. Clicking on the count
will load the leads with the columns of ‘Rejected’
(default sorted, the date when the last user of the Organization has rejected),
and ‘Assigned’.
10. Pending – This will provide the count of the number of
assigned leads that are neither accepted nor rejected by the User. Clicking on
the count will load the leads with the columns of
‘Assigned’ (default sorted) and ‘Added to Pool’.
“Organization-wise
Routed Leads” widget
This will have the grid of assigned Organizations
of the Lead Routing with extra columns of Assigned, Accepted, Rejected, and
Pending.
Assigned–
This will provide the count of the number of leads from the pool that are
assigned to that Organization i.e. routed. The count will be a total of Accepted,
Rejected, and Pending Leads of that Organization. Clicking on the count will
load the leads with the columns of ‘Assigned’ (default
sorted) and ‘Added to Pool’.
Accepted–
This will provide the count of the number of assigned leads accepted by the
users from the Organization. Clicking on the count will load the leads with the columns of ‘Accepted’ (default sorted) and
‘Assigned’.
Rejected–
This will provide the count of the number of assigned leads that are rejected
by all users of the Organization. Clicking on the count will load the leads with the columns of ‘Rejected’ (default sorted, the date
when the last user of the Organization has rejected), and ‘Assigned’.
Pending –
This will provide the count of the number of assigned leads that are neither
accepted nor rejected by any of the users from the Organization. Clicking on
the count will load the leads with the columns of
‘Assigned’ (default sorted) and ‘Added to Pool’.

If
a particular Organization is selected in the Organization dropdown and the Users
dropdown has “All” selected, then the stats will be populated for users of the
Organization only.
If a particular User is selected in the
Users dropdown, then the stats will be populated for that User only.