How do I create a blog drip?

It is possible to personalize navigation menus within Mindmatrix software. If you are unable to navigate to the correct page, contact your platform administrator.
Accessing the Drip Campaign template editor:
Accessing the drip template editor from the "Asset Template" gallery:
Social drips allow to automatically post content to your social media accounts. To create a blog drip, go to “Setup”, then “Asset Management,” then “Social Drip”.
Accessing the drip template editor from the "Manage" tab:
Alternatively, you can go to “Manage”, then “Campaigns”, then “Social Drip”.
Creating the Blog Drip Template:
Click on the blue “Create” button.
Give your template a name and then click on the arrow icon.

Optional information fields:
- Description: add any relevant explanatory notes and comments
- Filters: add search filter tags
- Thumbnail: Add a thumbnail image for the template
Select a start date for your drip campaign, and then click on the "Blog" checkbox, and then click on the arrow icon.

It is only possible to select "blog" if you have activated your account blogger/wordpress account, for instructions on how to do that, visit:
Use the menus at the top of the page to select your campaign timeframes.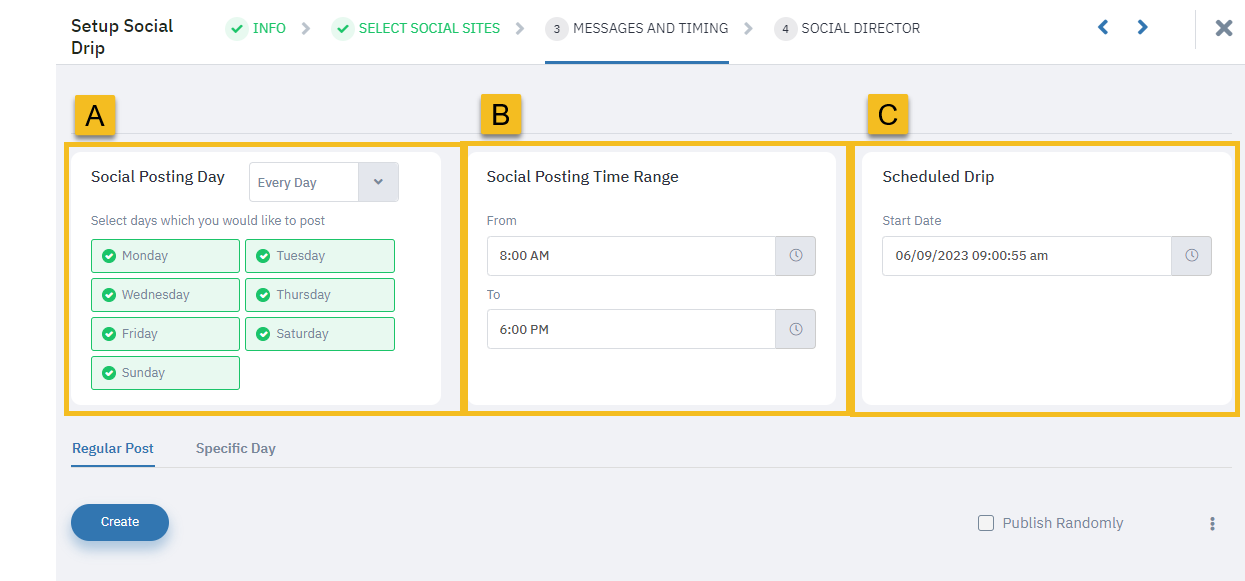
Campaign Timing Menus:
A. Social Posting Days: Select which days posts can occur
B. Social Posting Range: Select the earliest and latest times that a post can occur
C. Scheduled Drip (Start Date): Select the date and time when the campaign will begin
To create campaign posts, click on either the "Regular Post" or "Specific Day" tabs and then click "Create".
Regular Post vs. Specific Day
- Regular Post: The platform will publish these posts on a regular interval.
- Specific Day: The platform will publish each post at a date and time the user selects.
Creating blog messages
Enter a blog message title and body text, and then click on the "Media" button to attach the blog content.
"Specific Day" Blog Posts
A. For "Specific Day" posts, this is where you enter the posting date and time.
Use the dropdown to select "Blog Post" and then select the blog template that you would like to use.
To generate you post, click "Save".
Repeat for all campaign posts. When you are satisfied with your messages and timing, click on the arrow icon to move to the next section.
Additional menu items for managing posts:
A. Publish Randomly (the platform will randomize posting times)
B. Download posting content onto a CSV file
C. Delete or reorder posts
Configuring the social director
Choose the entities that the campaign will go out on behalf of. Use the tabs to access lists of Users, Groups, and Organizations, and the "Add/Remove" toggles to select specific entries from each list. Once you have made your selections, click "Finish"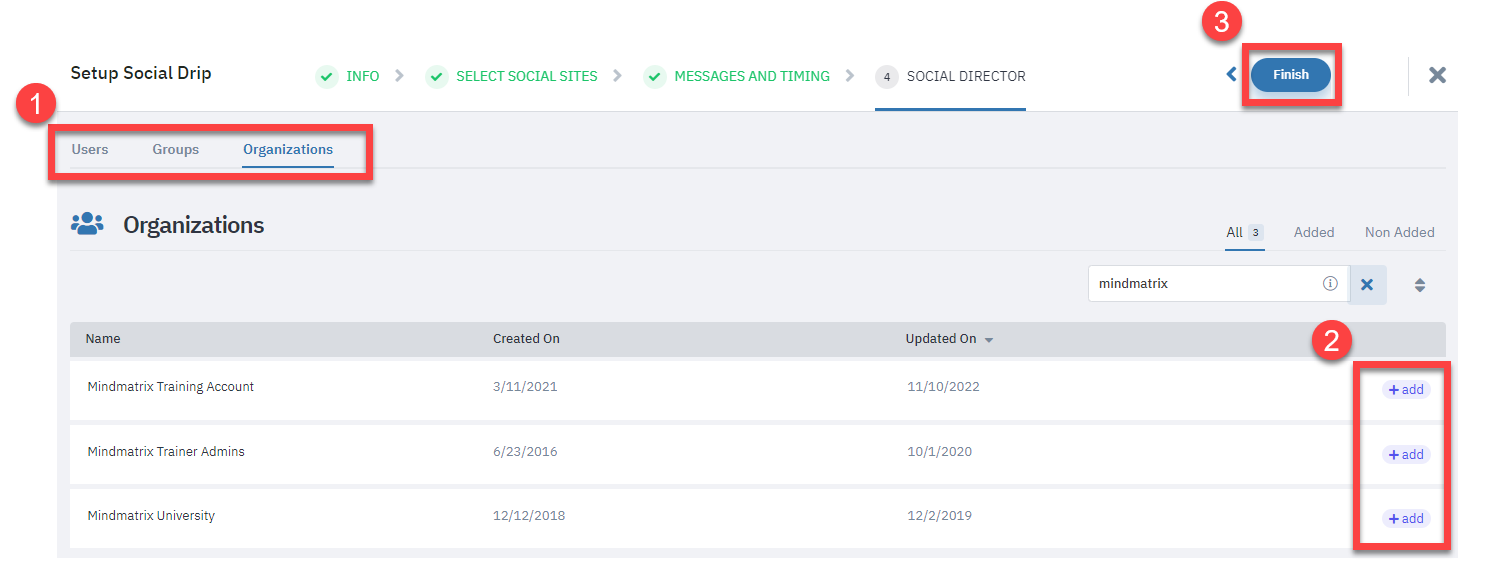
Review and Wrap Up
The drip campaign will now begin at whatever time you selected.
You can return to the Drip Campaign template gallery to start, stop, or schedule your campaign at any time.